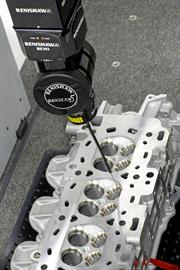
Five-axis technology and powerful metrology software allows fast measurement and analysis of valve seats and valve guides
 A new solution based on Renishaw’s revolutionary REVO® five-axis measurement system for co-ordinate measuring machines (CMMs) is dramatically changing this situation, enabling very fast collection of large amounts of data, from which the analysis parameters for both the valve seat and the valve guide features can be calculated. The method performs exceptionally well in both repeatability and reproducibility tests, and takes as little as 20 seconds per valve.
Data collection using helical scans and adaptive scanning
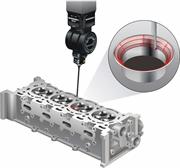
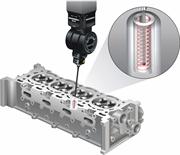
 The new measurement process involves two helical scans, one on the valve guide bore and the second over the valve seat area. On the guide a single helical scan is used with a typical pitch of 0.5 mm, at a scanning speed of 150 mm/s, whilst for the seat a single helical scan is carried out at a finer pitch of 0.1 mm and a faster scanning speed of 500 mm/s. The latter scan utilises REVO®’s powerful adaptive scanning capability, which allows a single scan command to cover the areas above and below the critical valve seat surfaces.
Data evaluation

The two measurement routines rapidly capture all necessary data about the valve seat and valve guide surfaces, which is then analysed within a utility embedded in Renishaw’s new MODUS™ metrology software. A report is automatically generated that includes analysis of valve seat form error, runout of the seat to the guide bore axis, circularity of the seat at any specified height, form error of the cones, and circularity profile of the guide cylinder at any specified height. This analysis facility is also provided by Renishaw to other metrology software providers that support the REVO® system.
With the new REVO® based process for valve seat and valve guide measurement taking just 20 seconds per valve, comprehensive inspection of a cylinder head can now be carried out in just a few minutes, which together with full data analysis, allows rapid feedback to upstream manufacturing processes.
Further information
Find out more about Renishaw's CMM probe systems and software, including a new CMM retrofit service.
News updates
Register for regular news updates from Renishaw
Editor downloads
Images
-
 REVO valve guide scanning
[2.0MB]
-
 REVO valve seat and stem scanning
[2.3MB]
All images and text - copyright Renishaw
